10.1 Importer Window:

The Audio Importer window allows you to import supported files and convert unsupported file, such as an mp3, in order to match your session parameters. When importing audio from an external drive, the audio files will be copied and saved within your session.
Session Parameters Selectors:
- File format: WAV, AIF or M4A
- Sampling Rate: From 22050 up to 19200
- Bit Depth: 16, 24 and 32
This window also includes global data options, which will apply entered information to all imported files.
Global Data Options:
- Add to playlist: Adds all of your imported files into a playlist.
- Metronome: This option acts as a global tempo. It will apply the tempo data to all of the imported audio files. If you are not sure of the BPM, you can easily find it out by tapping on the TAP button.
- Add Keywords: This drop down menu shows all of the keywords categorized by feel and alphabetical order to help you find the right keywords for your sound.
- Find Browser: The Find browser helps you find any keyword that is already in the metadata of a file in the importer.
- Replace: Add and Sort box:
- Add: Applies the keyword entered all the audio being imported.
- Replace: You can easily replace a keyword by typing the keyword you wish to replace, entering the new keyword in the replace box and hitting OK.
Importer buttons:
- Add Files…: Opens finder window to select the audio files you wish to import.
- Remove All: The Remove All button will remove all the audio files displayed in the importer window.
- Cancel: Closes the importer window.
- Import: Imports all audio files displayed in the importer window.
To remove undesired files from the importer, click on that file and press ‘Delete.’
To import audio:
- Go to FILE > Import (Command + I)
- Select the format, sample rate and bit depth for the audio you would like to import.
- Click on “Add files”
- Select your files and click on ‘Open’.
- All the selected files will be displayed.
- Press the Import button.
The imported audio will be saved within ‘Your Library’ in the folder indicated by the Category box.

10.2 Adding Metadata:

Audio Design Desk is a powerful tool to build your own sound library, and for that reason, it provides you with a variety of options to add metadata to your sound files. In this window you will be able to change the sounds title, specify the intensity and complexity, set the category, type and subtypes along with other options.
You are able to edit metadata when importing as well as by right clicking on a sound and selecting ‘Edit Metadata.’
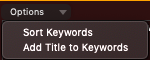
On top of the keywords window metadata viewer, there is an Option drop-down menu.
This menu allows you to sort your keywords by alphabetical order and add the words in the title as keywords.
10.3 Applying Your Own Sonic Intelligence
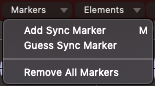
Markers Menu: Enables you to manually add a sync marker to your sounds.
- Add Sync Marker (M): Place your cursor in the desired transient for a sync marker within the waveform and click “Add Sync Marker” or press M.
- Guess Sync Marker: The software will guess where to add a sync marker.
- Remove All Markers: This options will clear all markers added to the audio clip.
Elements Menu: Gives the option to create new elements within one sound.

- Create Element Markers From Selection (U): Make a selection in the area where you wish to create a subdivision, then press “U”. Brackets will appear around your selected section which will turn into solid lines within your file when imported. These lines allow you to separate a region using “Command + D”.
- Import Original: When creating elements in the audio file, the original audio file will be imported along with the new individual elements.
- Create Elements on Import: Select this when you wish to import each section as an individual new element.
- Destination: The subdivisions created can be saved in your session or in an external location.
- Default: Saves all created elements to ‘Your Library’ and categorizes it by using existing metadata.
- Choose…: Gives the option to send your newly created elements to a specific location.
Snap Menu: The Snap menu snaps the cursor to the beat or subdivision.